

Microsoft 365 Copilot vs Glean: the permissions question that actually decides it

Sooner or later, someone in a Microsoft shop asks it out loud: should we just buy Glean instead of turning on Copilot? Usually the thinking is that one of them must be safer with company data than the other. It is a fair question, and the honest answer is not the one either vendor’s deck gives you.

Both are enterprise AI that answers questions over your own company content. Microsoft 365 Copilot does it from inside Microsoft 365, grounded on your SharePoint, OneDrive, Exchange and Teams, reaching outside through Graph connectors. Glean does it across the whole app estate, pulling from Google Drive, Slack, Salesforce, Jira, Confluence, Microsoft 365 and the rest through its own connectors. One is deep in one place. The other is broad across many. Hold that thought, because it is the real difference and we will come back to it.

The thing they do identically

First, the part people get wrong. Both are permission-aware. Neither invents access.

Glean pulls the permission map, the access-control list, from every source it connects to, and filters what it retrieves down to what you personally can see. In their own words, if you do not have access to a document in Google Drive or a channel in Slack, it never appears in your Glean results and never lands in an answer it writes for you.

Copilot behaves the same way inside Microsoft 365. Every prompt runs in your security context. If you cannot open a file in SharePoint, Copilot will not summarise it for you. It only ever surfaces what you already had permission to reach.

So on the question people actually lose sleep over, “will it hand data to someone who should not see it”, both give the same answer: no, not beyond what your permissions already allow.

The mess both of them inherit

And there is the catch neither deck leads with. Permission-aware cuts both ways. It faithfully reproduces your access model, mess and all.

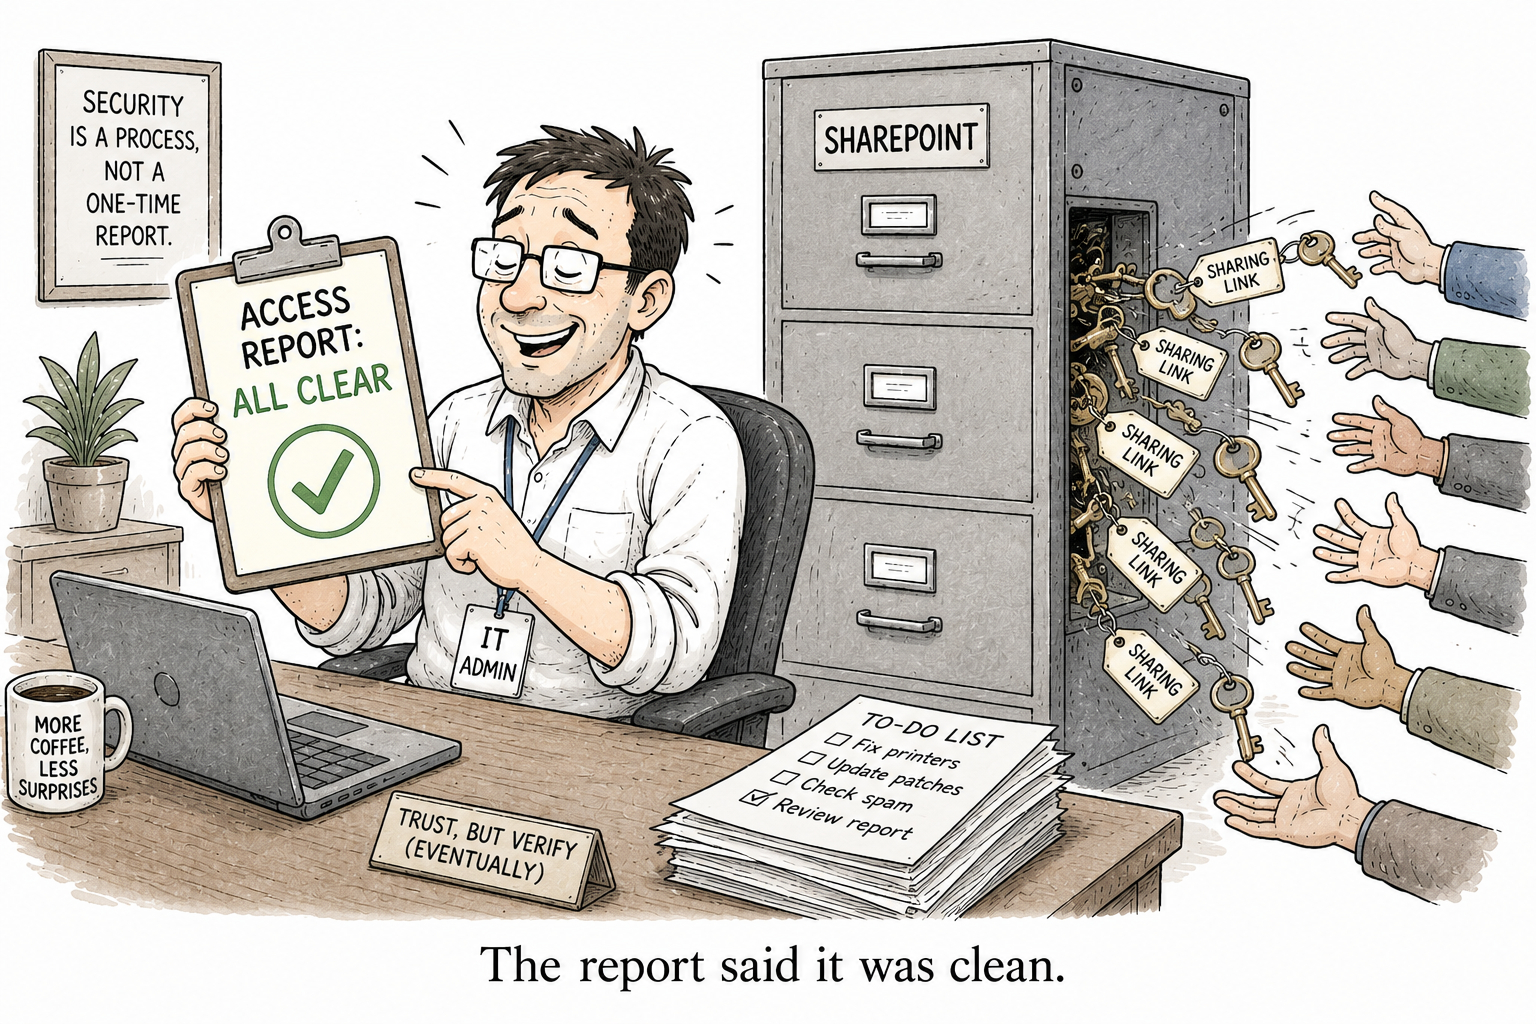
A document shared with Everyone is a document both of them will happily hand to everyone, because everyone genuinely has permission. A folder a departing employee opened up three years ago is fair game the moment somebody asks the right question. Neither tool overshares. Your tenant already did. The assistant just takes what was buried under a thousand folders and makes it instantly reachable, in plain language, to anyone who thinks to ask.

This is why switching from one to the other fixes nothing about safety. If your SharePoint is overshared, Copilot surfaces it. If your Drive and Slack are overshared, Glean surfaces it. The assistant is only ever as clean as the permissions underneath it, and picking a different assistant does not clean them.


So what actually decides it

If safety is a wash, two things are left, and these are the ones to argue about.

Reach. Copilot is native and deep in Microsoft 365, so if that is where your knowledge lives, it needs nothing extra to be useful, with Graph connectors extending it outward when you need them. Glean’s whole pitch is breadth: if your organisation’s knowledge is scattered across a dozen SaaS apps, Glean was built to index all of it in one place and answer across the lot. A heavily Microsoft shop leans one way. A best-of-breed-SaaS shop leans the other. This, not security, is the honest deciding line.

The governance around it. Microsoft does not just hand you Copilot, it hands you the machinery to manage the oversharing Copilot exposes: Purview for data loss prevention and sensitivity labels, SharePoint Advanced Management for Restricted Content Discovery, Restricted Access Control, and the Data Access Governance reports. Glean brings its own model, single-tenant connectors, permission sync kept current across every app, least-privilege enforcement, and zero-retention agreements with the model providers so your data is never used for training. Both are serious. They are serious in different shapes: one is a governance stack you assemble around the assistant, the other is a posture baked into the platform.

The honest verdict

So it is not “which is safer”, because on the answer that matters they behave the same. It is “where does your knowledge actually live, and how much Microsoft governance do you already own”. A Microsoft-centric org already holding Purview and SharePoint Advanced Management has most of the toolset and the native depth in hand. An organisation whose real knowledge is spread across non-Microsoft SaaS has a genuine case for Glean’s breadth.

But the decision underneath both, the one that actually determines whether either is safe to switch on, is the same no matter which logo you pick. They surface what people can already reach. So the work is not choosing the assistant. The work is fixing the oversharing first, so that when you do turn one on, it has nothing embarrassing to find.

That part, the who-can-currently-reach-what across your Microsoft estate, is what I built User Access Explorer to show. Whichever assistant you land on, do that first.

Sensitivity labels and Copilot: which ones actually keep content out

A user opens a protected document, reads it without any trouble, and then asks Copilot to summarise it. Copilot refuses. It just hands back a link to the very file they already have open. So they raise a ticket saying Copilot is broken. It is not broken. It is doing one thing right that almost nobody knows about.

How Microsoft 365 Copilot behaves around sensitivity labels comes down to a single usage right you have probably never looked at, called EXTRACT. Once that one idea lands, the rest of it stops being confusing.

VIEW lets you read. EXTRACT lets Copilot summarise.

When a sensitivity label applies encryption, it grants each person a set of usage rights. Two of them matter here. VIEW is the right to open the file and read it. EXTRACT, which shows up in the Purview portal as “Copy and extract content” and carries the friendly name Copy, is the right to copy text out of it.

Copilot needs EXTRACT. Not VIEW, EXTRACT. In Microsoft’s own words, if the content grants a user VIEW but not EXTRACT, Copilot will not summarise it and can only point to it with a link.

So the user in that ticket had VIEW and not EXTRACT. They could read the file with their own eyes all day. Copilot, which works by pulling the text out, was never allowed to. Same file, same person, two different answers, and both are correct.

One exception is worth knowing: whoever applied the encryption always has EXTRACT, because they own it. So a file you protected yourself will always come back to you in Copilot. The restriction is for everybody else.

So here is the switch

Turn that around and you have the cleanest control you will find. If you want a class of content genuinely out of Copilot’s reach, use a sensitivity label that applies encryption without the Copy (EXTRACT) right. People who need to can still open and read. Copilot cannot summarise it, quote it, or carry the text into anything it generates. You have not taken access away from anyone, you have taken it away from the machine.

The stronger settings go further. Content labelled with user-defined permissions is off-limits to Copilot and agents entirely while it sits unopened in SharePoint or OneDrive. And Double Key Encryption, the one meant for your most sensitive material, Copilot cannot touch at all.

Now the trap

Here is where people get a false sense of safety. You put a Confidential label on the site, assume everything inside it is now hidden from Copilot, and move on. It is not. A label applied to a container, a SharePoint site or a Microsoft 365 group, is not inherited by the files inside it. Copilot does not see the site’s Confidential label on the document, and the document carries no protection of its own. As far as Copilot is concerned, the label on the site does nothing at all for the files.

If you want the files protected, the label has to be on the files. The site label is for the site.

What Copilot writes carries the label forward

There is a nice half to this. When Copilot builds new content out of labelled sources, it inherits the highest-priority label among them. Summarise three documents where the most sensitive is Confidential, and the summary itself comes out Confidential. The protection follows the content into whatever Copilot produces, which is exactly the behaviour you would want.

How to check one file in ten seconds

If you are ever not sure whether a document you can open is also readable by Copilot, open it in the Windows Office app and add Permissions to the status bar. Click the icon next to the label name, look at My Permission, and read the value for Copy. Yes means EXTRACT, which means Copilot can use it. No means it cannot.

The one thing labels do not do

Labels decide what Copilot is allowed to do with a file. They do not decide who can open it. A document shared with Everyone is still shared with Everyone; the label only stops Copilot from summarising it for them. So a label is a good lever, and it is not a substitute for fixing who has access in the first place. If you also want to block Copilot from summarising specific labelled files without touching their encryption, a Purview DLP policy for the Copilot location can do that, but the EXTRACT right is the idea that explains everything else.

The access question is still yours to sort out. If that is where you are stuck, I wrote a free tool for it: User Access Explorer.

Restricted Content Discovery vs Restricted SharePoint Search: what actually hides content from Copilot

An admin switches on Restricted SharePoint Search to keep Copilot away from the messy sites nobody has cleaned up yet, tells the boss it is handled, and one week later the help desk is full of “I cannot find anything in search now” tickets. Two features sound like they do the same job, and picking the wrong one is exactly how you land in that week.

So there are two of them: Restricted SharePoint Search and Restricted Content Discovery. Both keep content out of org-wide search and out of Microsoft 365 Copilot. But they are not the same tool, they are not meant for the same job, and as of this month one of them is on its way out.

Restricted SharePoint Search: a blanket over the whole tenant

Switch it on, and org-wide search and Copilot see only the sites you put on an allowed list (up to 100), plus each user’s own OneDrive, the sites they visit often, and the files that were shared with them or that they recently touched. Everything else drops out of tenant-wide discovery. Not deleted, not locked, just invisible to search.

Microsoft has always called this a temporary measure, and now they are ending it. From 31 July 2026, you can no longer turn Restricted SharePoint Search on for the first time, and the official word is to move to Restricted Content Discovery instead. If you already have it on, the plan is the one it always was: use it to buy time, fix the oversharing underneath, and then switch it off.

So it was never meant to stay. A tenant where search only ever returns 100 sites is a tenant where people quietly stop using search, and Microsoft’s own advice is to disable it once you have cleaned up.

Set-SPOTenant -EnableRestrictedSharePointSearch $true

The allowed list, up to 100 sites, you curate with Add-SPOTenantRestrictedSearchAllowedList, Remove-SPOTenantRestrictedSearchAllowedList and Get-SPOTenantRestrictedSearchAllowedList, passing a site URL or a CSV of them.

Restricted Content Discovery: a switch on one site

This is the one Microsoft is now pointing everyone to. It is per-site. Turn it on for a site, and only that site’s content drops out of org-wide search and Copilot. Every other site stays exactly as it was. No allowed list, no tenant-wide blanket, just a flag on the sites that really need it.

Set-SPOSite -Identity "https://contoso.sharepoint.com/sites/Finance" `
    -RestrictContentOrgWideSearch $true

# read it back
Get-SPOSite -Identity "https://contoso.sharepoint.com/sites/Finance" |
    Select-Object Url, RestrictContentOrgWideSearch

There is a licensing catch. Restricted Content Discovery is a SharePoint Advanced Management feature, so you need SharePoint Advanced Management to use it, which you get either by having Microsoft 365 Copilot licensed (even a single user counts) or by buying the add-on. Restricted SharePoint Search needed no such thing, and that is the main reason the blunt one was what most tenants reached for first. Now that it is retiring, the licensed per-site switch is what is left.

The difference that actually matters

So here is the whole thing in one line. Restricted SharePoint Search decides what is discoverable and hides everything else. Restricted Content Discovery decides what is not discoverable and leaves everything else alone. One is opt-in for the entire tenant, the other is opt-out for a handful of sites.

The blanket was for the panic phase, when Copilot is going live tomorrow and you have audited nothing. The per-site switch is for afterwards, when you already know which three sites hold the sensitive material and you want them out of Copilot without breaking search for everybody else. Microsoft has now made that choice for you: the blanket is being taken away, and the switch is what remains.

What neither of them does

Now the part people miss, and Microsoft is blunt about it in its own docs: neither feature is a security boundary, and neither changes who can open the content. That Everyone-except-external claim on the finance site is still sitting there. That organisation-wide sharing link still works. Anyone who already had access still walks straight in, search inside the site still finds everything, and while the blanket is on, Copilot will still surface a site to a user who recently visited it. You have not fixed the oversharing at all. You have only stopped Copilot from putting a spotlight on it in front of the whole company.

That is a reasonable thing to do while you clean up. It is a bad thing to mistake for the cleanup. The access is the real problem; discovery is only the symptom that Copilot made loud.

So the order is simple, and it is the order Microsoft itself recommends. Find the oversharing first, decide which sites genuinely need to stay hidden, and use Restricted Content Discovery on those. These controls only buy you the time to do it. They do not do it for you.

I wrote a free tool for the finding-the-oversharing part, if that is where you are stuck: User Access Explorer.

User Access Explorer: a tool to see what a user can reach in SharePoint

Someone in your tenant opens Copilot, asks it to pull together last quarter’s numbers, and it hands back a figure from a workbook they were never meant to open. The permission was sitting there the whole time. Nobody caught it because SharePoint has no single screen that answers the one question an admin actually asks: what can this person get to, and how did they get it?

I got tired of stitching that answer together by hand, so I built a small tool for it. It is called User Access Explorer, it is free, MIT-licensed, and it lives here: github.com/gvijaikumar9/UserAccessExplorer.

What it actually does

You pick a user. The tool walks the sites they can reach and shows every route that gets them in, one row per route. A route is the a direct grant, a SharePoint group, an Entra (Microsoft 365) group, an Everyone or Everyone except external users claim, or a sharing link.

The routes that matter get pushed to the top. The tool splits access into Granted (someone deliberately gave it) and Overshared (a claim or a link handed it out to more people than anyone intended). Overshared is Microsoft’s own word for it in the Copilot and SharePoint Advanced Management reports, so I kept it. That Overshared bucket is the whole point of the tool. It is the list you hand to whoever owns the site and say “explain this one”.

A couple of things I learned building it, because they trip up most home-grown permission scripts:

  • Contributor is not enough. Reading permissions needs Full Control. A script running as a plain contributor will return confident, wrong answers because it simply cannot see the role assignments. For one site you need Site Owner or Site Collection Admin. For the whole tenant you need an app registration with Sites.FullControl.All, because being a tenant admin does not make you site admin everywhere.
  • The scope in a sharing-link group name is a lie. A link shows up internally as a group called SharingLinks.<guid>.Flexible.<id>, and that word “Flexible” tells you nothing about who the link reaches. Only Get-PnPFileSharingLink gives you the real scope. The tool always asks it.
  • A sharing link is not a per-user grant. If you only ask “what can this user do on this file”, a link never shows up, no matter how deep you crawl, because the link grants a hidden group and not the person. So the tool answers a second, separate question on every shared item: does this link’s audience actually include the user? Anonymous and Organization links reach them; a Users link only if their name is on it.

What you need

  • PowerShell 7.2 or newer.
  • PnP.PowerShell 2.12 or newer (Install-Module PnP.PowerShell).
  • An Entra app registration you can sign in with interactively. If you do not have one, the next step makes one. The GUI also has a “Register one for this tenant” link in the connect box that does the same thing.
  • For the extras: User.ReadBasic.All so the people picker can search, and GroupMember.Read.All so it can confirm group membership instead of guessing.

Register the app

Skip this if you already have an app registration with SharePoint Full Control. If not, PnP will create one for you and walk you through consent in the browser:

Register-PnPEntraIDAppForInteractiveLogin `
    -ApplicationName "User Access Explorer" `
    -Tenant contoso.onmicrosoft.com `
    -Interactive

It opens a sign-in window and asks you to grant consent. The one thing to get right is the consent: this tool reads permissions, so it needs Sites.FullControl.All, and for the people picker and membership checks it needs the Graph scopes User.ReadBasic.All and GroupMember.Read.All. Granting that consent needs a tenant admin, so if that is not you, send them the link the command prints.

When it finishes it prints the new Client ID. Copy it, you paste it into the tool in a moment.

Install it

git clone https://github.com/gvijaikumar9/UserAccessExplorer.git
cd UserAccessExplorer
Import-Module .\UserAccessExplorer.psd1

That gives you the PowerShell commands. For the app, run the GUI script:

pwsh -File .\gui\Show-UserAccessExplorer.ps1

Using the app

The connect box opens on launch. Paste your app’s Client ID and your tenant admin URL (the ...-admin.sharepoint.com one), sign in, and the chip at the top right turns green with your tenant name.

From there:

  1. Start typing a name or email in User. It searches after the second letter and drops the matches below, so you pick rather than type the whole thing.
  2. Choose a Scope. One site checks a single site. One site (deep) walks that site’s subsites, lists and items that have their own broken-inheritance permissions, which is where oversharing hides. Whole tenant sweeps every site, and it is slow, so it runs in the background with a progress count and a Stop button.
  3. Hit Scan.

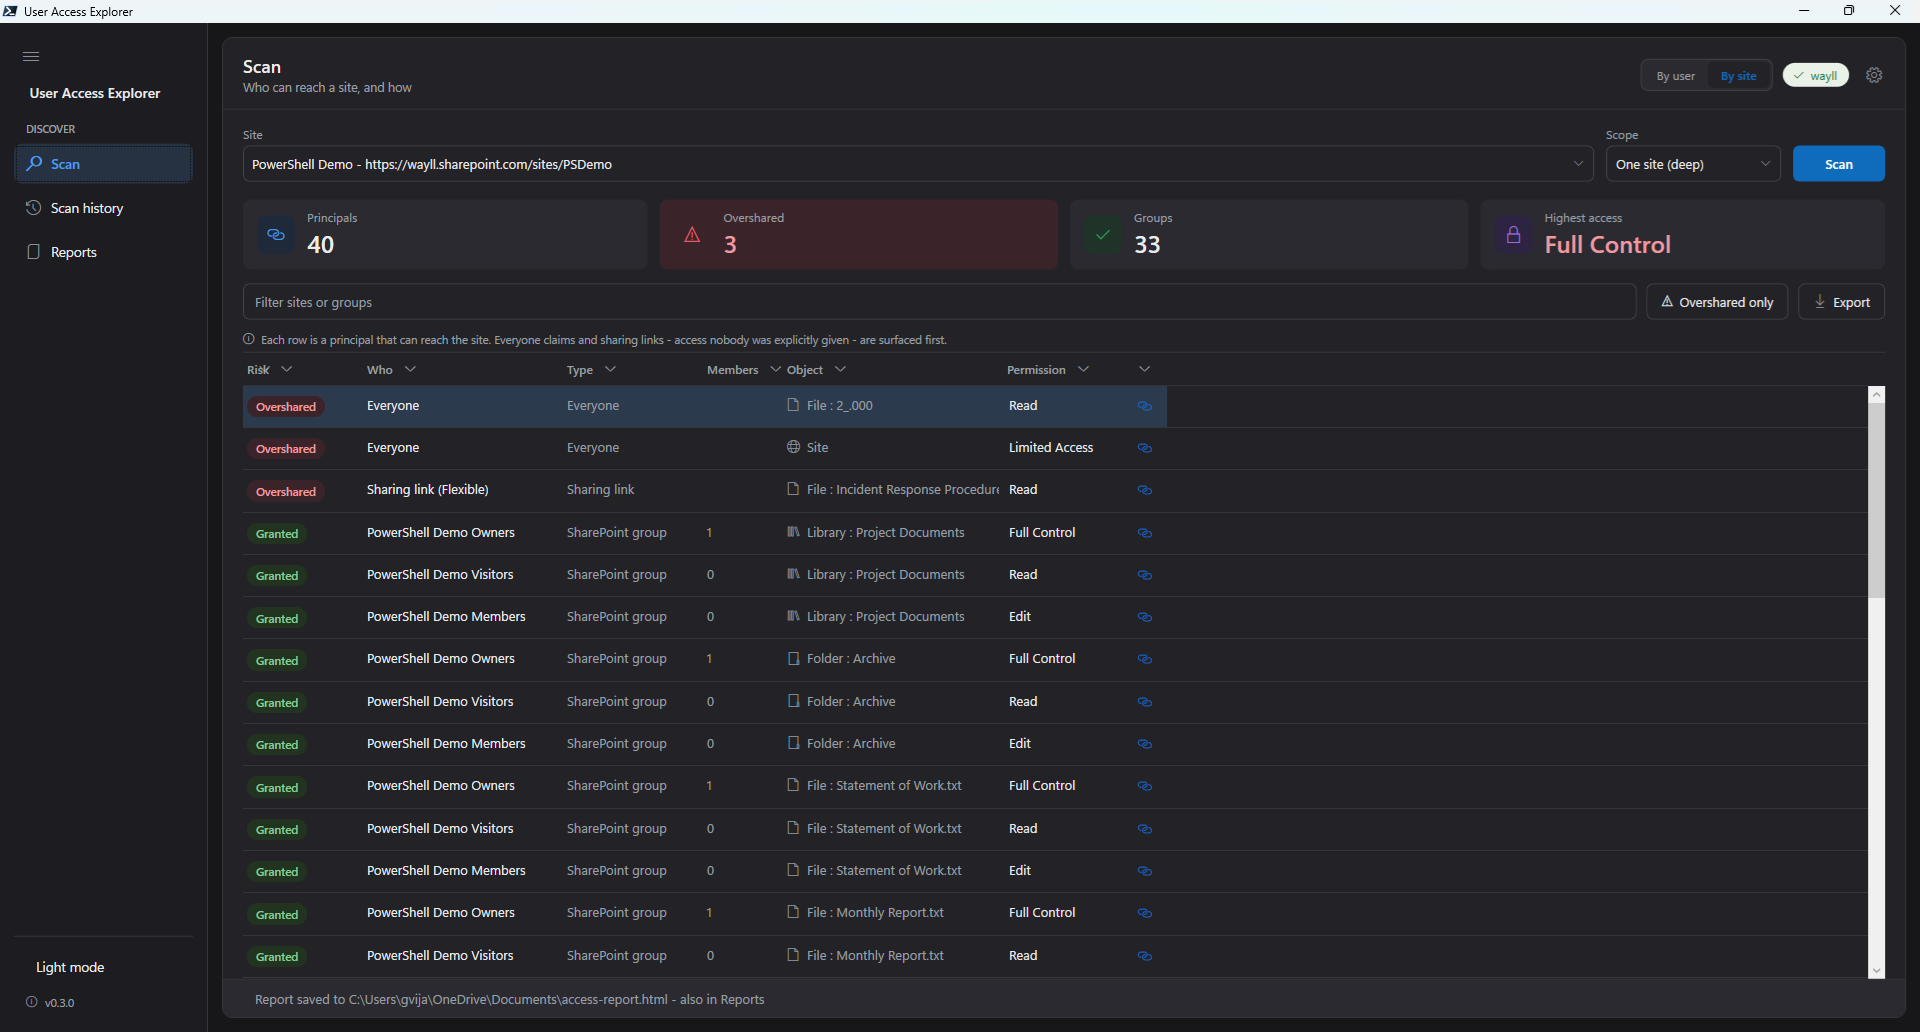
The four tiles across the top give you the shape of it at a glance: how many routes, how many are Overshared (the tile goes pink when that is above zero), how many sites, and the highest level of access the person holds anywhere. The grid underneath is one row per route, with a Grant path column reading like Everyone claim -> Read or Marketing Members -> Edit. Click any column header to sort, or use the chevron to group or filter. The small link icon in the Site column opens the exact page in SharePoint where that access is managed, so fixing it is one click away.


Comparing two people

Flip the Single user label to bring in a second user, and the scan runs both and diffs them. You get three buckets: Shared by both, Only the first person, and Only the second. This is the one I reach for when someone says “give the new starter the same access as her manager” and I want to see exactly where the two differ before copying anything.

Every finished scan is saved under Scan history, so you can reopen it instantly later without hitting SharePoint again, and there is an Export button that writes a self-contained HTML report you can forward.

Turn it around: who can reach a site

There is a mirror image of that question, and it matters just as much. Pick a site instead of a person, and see who can reach it, and how. Flip the By user / By site switch in the header and the subject becomes the site.

Now every row is a principal that can get in: a user, a SharePoint group, an Entra group, an Everyone claim or a sharing link, with the Overshared ones sorted to the top again. Groups carry a member count, so Marketing Members (2) and Marketing Members (340) are easy to tell apart. Run it deep and it walks the subsites, libraries and files that have their own permissions, so a document shared with Everyone three folders down gets its own row.


This is the view to run before you turn Copilot loose on a site. The question stops being whether one person can see something and becomes who can see it, how many of them there are, and whether anyone meant for them to.

To view scan history and reports

If you prefer the command line

The GUI is a shell over the module, so everything is scriptable. The one flag to remember is -OversharedOnly, which drops the noise and leaves you only the routes worth acting on:

Get-UserAccess -User jane@contoso.com `
    -SiteUrl "https://contoso.sharepoint.com/sites/Marketing" `
    -ClientId "<your-app-id>" -Interactive -OversharedOnly |
    Export-UserAccessReport -Path .\jane-access.html -Html

Swap -SiteUrl for -TenantWide -TenantAdminUrl "https://contoso-admin.sharepoint.com" to sweep everything, or add -Deep -IncludeItems to go down to the file level on a single site.

The by-site side has its own command, Get-SiteAccess:

Get-SiteAccess -SiteUrl "https://contoso.sharepoint.com/sites/Marketing" `
    -ClientId "<your-app-id>" -Interactive -Deep -OversharedOnly

Add -ExpandMembers and every group becomes one row per person, for the full list of who can actually reach the site.

It pairs well with the sharing-link work in my PnP PowerShell posts. If you run it and something looks off, open an issue on the repo.

Microsoft Graph PowerShell vs PnP PowerShell: Which One to Use

[AUTHOR: open on a specific moment you hit this. A task where you installed the wrong module, or watched someone run both with two sign-in prompts stacked up for a job that touched a single SharePoint list. One or two concrete sentences.]

Every comparison of these two modules lists the same feature differences and stops exactly where the useful part starts. Which one do you install, today, for the thing in front of you.

For SharePoint work, the honest answer is not the one the comparisons set up.

The short version

SharePoint work, meaning sites, lists, libraries, permissions and content: PnP PowerShell.

Everything else in the tenant, meaning users, groups, licences, Teams, Intune, conditional access: Microsoft Graph PowerShell.

They are built completely differently

Microsoft Graph PowerShell is autogenerated from the Graph API. Every endpoint Microsoft exposes becomes a cmdlet, automatically, which is why the full umbrella runs to over forty sub-modules. It reaches the entire tenant, and the cmdlet names carry the fingerprints of the machine that generated them rather than a person who sat down to name them.

PnP PowerShell is community-built, focused on SharePoint, and its names read like English. On my machine it exposes 775 commands, every one shaped Verb-PnPNoun:

Get-PnPList
Get-PnPListItem
Set-PnPListItem
Add-PnPFile
Get-PnPSiteCollectionAdmin

You can guess most of them without looking. Writing a script at speed, one you have not written before, that guessability does more real work than any feature table will ever capture.

The support difference nobody says out loud

Microsoft Graph PowerShell is a Microsoft product. Something breaks, you have a support path and a ticket to raise.

PnP PowerShell is community-maintained. Microsoft backs the PnP initiative, but the module itself carries no official support and no ticket queue. It is excellent and it is everywhere, and none of that helps you at 2am when a production job has stopped and your organisation’s rule is that automation runs on vendor-supported tooling. Somewhere with that rule, the support line decides everything before the feature comparison even starts.

The September 2024 change is the tell. Microsoft deleted the shared app registration PnP had always used, and overnight every PnP script needed its own app registration to sign in. That is a community timeline landing on production systems, and I wrote the whole episode up in Connect-PnPOnline: Specified Method Is Not Supported.

Where each one is genuinely better

PnP wins on SharePoint depth, and it is not close. Graph can read a list and write an item. The moment the job is a permission audit, a bulk field change, a site template, or version cleanup, PnP has a command for it and Graph has you hand-assembling raw API calls. Everything in my PnP PowerShell posts would be considerably more work in Graph.

Graph wins on everything that is not SharePoint. Users, groups, licence assignment, Teams, mailboxes, devices, sign-in logs, conditional access. PnP has crept into a little of this, it even ships Get-PnPEntraIDApp and sign-in report commands, but Graph is the native home and always will be, because that is the API it is generated from.

Both do authentication properly

Neither module makes you trade away an auth method to get it. Connect-PnPOnline covers the full range:

-Interactive        yes
-DeviceLogin        yes
-ClientId           yes
-ClientSecret       yes
-CertificatePath    yes
-Thumbprint         yes
-ManagedIdentity    yes
-AccessToken        yes

Interactive when you are at the keyboard, certificate or managed identity for the unattended jobs. Connect-MgGraph covers the same ground on the Graph side.

The part that changes the question

PnP can call Graph directly. It ships with two commands for exactly that:

Invoke-PnPGraphMethod
Get-PnPGraphAccessToken

From inside a PnP session that is already connected, you can hit any Graph endpoint that has no PnP command of its own:

Invoke-PnPGraphMethod -Url "v1.0/users?`$top=5" -Method Get

Most comparisons never mention this, and it quietly dissolves the whole versus. A job that is mostly SharePoint with a little Graph in it does not need two modules, two connections and two auth contexts held in your head at once. You connect with PnP, do the SharePoint work with PnP commands, and drop to Invoke-PnPGraphMethod for the one user lookup you actually need.

So, in practice

  • Mostly SharePoint: install PnP, and reach into Graph with Invoke-PnPGraphMethod when you need to.
  • Mostly users, groups, Teams, devices: install Graph. It is the native tool and it is supported.
  • Production automation under a vendor-support rule: that rule decides it. Graph.
  • Both all day: install both. They coexist without complaint, and each is best at its own half.

Treating this as a religious choice is the thing that irritates me about how it gets argued online. They are tools with different shapes. I reach for PnP first because I live in SharePoint, and Graph stays installed for the days I do not 🙂

Find and Revoke SharePoint Sharing Links with PowerShell

Sharing links are the quietest oversharing problem in SharePoint. Somebody clicks Share, picks “anyone in the organisation”, and eighteen months later that link is still live and nobody remembers it exists. It does not show up as a normal permission. It hides as a group with a name like SharingLinks.042f4d62-d446-4d80-83d1-fdb40ce5956d.Flexible.23ce70ce, which nobody reads.

Then you turn on Copilot, and Copilot is very good at finding files people can reach. Every one of those forgotten links is now one prompt away from the wrong person.

I could not find a free tool that lists these links across a tenant, rates how risky each one is, and lets you revoke the bad ones. So I wrote one. It is on the PowerShell Gallery:

Install-Module SharingLinkAudit

It is on the PowerShell Gallery if you want to see the version and what is in the package first, and the source is on GitHub, MIT licensed. This post is how to use it.

Before you start

It needs PnP.PowerShell and your own Entra ID app registration, the same one any PnP tool needs since the shared app was retired. If you have not set that up, I wrote it up separately in Connect-PnPOnline: Specified Method Is Not Supported. Once you have the client ID, you are ready.

Audit one site

Get-SharingLink -SiteUrl "https://contoso.sharepoint.com/sites/Sales" `
    -ClientId "your-app-id" -Interactive

A browser opens, you sign in, and you get one object per link. A risky one looks like this:

ItemName    : Monthly Report.txt
ItemPath    : /sites/Sales/Shared Documents/Monthly Report.txt
Scope       : Organization
Access      : Edit
Recipients  : Everyone in the organisation
Expiration  :
HasPassword : False
RiskLevel   : High
WebUrl      : https://contoso.sharepoint.com/:t:/s/Sales/IQBiTS8ERt...
LinkId      : d695e0ac-057f-49fb-8d01-eff6bb843a44

Read that in one line: anyone in the organisation can edit this file, through a link that never expires. That is why it scored High.

If a site is clean it tells you so, rather than printing nothing and leaving you wondering whether it worked:

No sharing links found across 1 site(s).

How the risk is scored

The RiskLevel is the whole point. It is what turns a long list into a short list of things to actually deal with.

  • Anonymous “anyone with the link” is the worst starting point. Organization “anyone in the company” is a real exposure but internal. Users, specific named people, is what sharing is supposed to be.
  • Edit is worse than View.
  • No expiry counts against the broad links, because those are the ones that linger.
  • An anonymous link with no password is a plain open door.

So a specific-person view link is Low, an org-wide edit link with no expiry is High, and an anonymous no-password edit link is Critical. You filter to what matters:

Get-SharingLink -SiteUrl $url -ClientId $id -Interactive -MinimumRisk High

Audit the whole tenant

This is the one people actually want. It needs SharePoint admin and the admin URL:

Get-SharingLink -TenantWide `
    -TenantAdminUrl "https://contoso-admin.sharepoint.com" `
    -ClientId "your-app-id" -Interactive -MinimumRisk High

It walks every site in the tenant. On a real tenant that is the slow mode, so it does not fight SharePoint’s throttling. If it gets a 429 it waits the amount SharePoint asks for and carries on rather than falling over.

The way it finds the links is the part worth understanding. It does not walk every file, which on a big library would be tens of thousands of calls. It reads the hidden SharingLinks groups, which tell it exactly which files have a link without touching the rest. A library of fifty thousand documents with two hundred shared items costs about two hundred lookups, not fifty thousand. That is what makes tenant-wide practical.

Turn it into a report

Nobody reads a thousand rows scrolling past. Send it to an HTML report instead:

Get-SharingLink -TenantWide -TenantAdminUrl $admin -ClientId $id -Interactive -MinimumRisk High |
    Export-SharingLinkReport -Path .\sharing.html -Html
Report generated: 14 link(s) written to C:\reports\sharing.html

That is a self-contained page, colour-coded by risk and sorted worst first with no external anything, that you can open in a browser and email to whoever asked “are we overshared”. There is a .csv option too if you want it in Excel.

[SCREENSHOT: the HTML report open in a browser, showing the colour-coded risk pills and the table of links. Take it from a run against the demo site, not a real tenant.]

Revoke the bad ones, carefully

Revoking a sharing link cannot be undone. The link is gone and whoever relied on it has to be re-shared. So always look before you leap:

Get-SharingLink -SiteUrl $url -ClientId $id -Interactive |
    Where-Object Scope -eq 'Anonymous' |
    Remove-SharingLink -WhatIf

-WhatIf shows you exactly what would be removed and deletes nothing. Read that list. Then, when you are sure, drop the -WhatIf:

Get-SharingLink -SiteUrl $url -ClientId $id -Interactive |
    Where-Object Scope -eq 'Anonymous' |
    Remove-SharingLink

Because it reads from the pipeline, you revoke exactly what you filtered, whether that is the anonymous ones, the expired ones, or everything on one site. I would not do a blanket “remove every link in the tenant”, because most of those links are shares people meant to create. Find the genuinely bad ones, agree them with the site owners, then remove that set.

Running it unattended

For a weekly report on a schedule, swap the browser sign-in for a certificate:

Get-SharingLink -TenantWide -TenantAdminUrl $admin `
    -ClientId $id -CertificatePath .\audit.pfx -Tenant contoso.onmicrosoft.com |
    Export-SharingLinkReport -Path .\weekly-sharing.csv

That version needs the app to have Sites.FullControl.All, which is a high permission. Grant it deliberately, to a dedicated app, not to the interactive one you use day to day.

That is the whole thing

Audit a site or the tenant, filter to what is risky, report it, revoke what you agree to. It found genuine org-wide edit links the first time I pointed it at a real tenant, which is rather the point. This stuff is already there, quietly, waiting for Copilot to surface it.

It is free and open source. If you find a bug or it misses something, the GitHub repo is the place. I would rather fix it than have you work around it 🙂

List Every List and Library in a SharePoint Site with PowerShell

You want a quick inventory of a SharePoint site: what lists and libraries are in it, how many items each holds, how big they are. It sounds like one command. It is, but the obvious version lies to you in two ways, and the way most people get sizes is the slow way.

Run against a real site on PnP.PowerShell 2.12.0.

Get-PnPList returns far more than you asked for

$all = Get-PnPList
$all.Count
Total lists returned : 19
Hidden               : 11
Visible              : 8

Nineteen, on a site where I created four things. The rest are the machinery SharePoint runs on: Solution Gallery, TaxonomyHiddenList, Theme Gallery, the user information list, and so on. Eleven of the nineteen are hidden.

So the first job is filtering. You want visible lists, and you want to keep it to actual lists and libraries rather than galleries and form-template stores. Two base templates cover that: 100 is a list, 101 is a document library.

Get-PnPList |
    Where-Object { -not $_.Hidden -and $_.BaseTemplate -in @(100, 101) } |
    Select-Object Title,
        @{n='Kind'; e={ if ($_.BaseTemplate -eq 101) { 'Library' } else { 'List' } }},
        ItemCount,
        @{n='LastChanged'; e={ $_.LastItemUserModifiedDate }} |
    Sort-Object Kind, Title
Title             Kind    ItemCount LastChanged
-----             ----    --------- -----------
Agent Knowledge   Library         4 22/07/2026
Project Documents Library        14 22/07/2026
Departments       List            4 18/07/2026
Projects          List           25 22/07/2026

LastItemUserModifiedDate is worth having in there. It is the last time a person changed something, which is how you spot the libraries nobody has touched in a year.

ItemCount is not the number of files

Look at Project Documents above, ItemCount 14. But there are not fourteen documents in it. I checked:

Project Documents ItemCount   : 14
Actual files                  : 8
Folders (also in ItemCount)   : 6

ItemCount counts folders as items. A library with eight files across six folders reports fourteen. If you are telling someone “this library has 14 documents”, you are wrong by however many folders it has.

For the real file count you have to ask, and filter by object type:

@(Get-PnPListItem -List 'Project Documents' -PageSize 500 |
    Where-Object { $_.FileSystemObjectType -eq 'File' }).Count

Same trap applies to a list with folders in it, which is rarer but does happen.

Size: the fast way and the slow way

This is where an inventory script quietly becomes an overnight job, so it is worth understanding the two approaches before you pick one.

The fast way: ask the site for its own number

Every site collection already knows how much storage it uses. One call gets it, but the call lives in the admin centre:

Connect-PnPOnline -Url "https://contoso-admin.sharepoint.com" -ClientId "..." -Interactive
$site = Get-PnPTenantSite -Identity "https://contoso.sharepoint.com/sites/Demo"
$site.StorageUsageCurrent
Fast: 1 MB in 805ms

One request, under a second, and it does not care whether the site has ten files or ten million. The catch is that it is a whole-site figure and it needs SharePoint admin. You cannot break it down per library this way, and you cannot run it as an ordinary site member.

The slow way: add up every file

If you need it per library, or you do not have admin, you sum the file sizes yourself:

$libraries = Get-PnPList | Where-Object { -not $_.Hidden -and $_.BaseTemplate -eq 101 }

foreach ($lib in $libraries) {
    $bytes = 0
    Get-PnPListItem -List $lib -PageSize 500 |
        Where-Object { $_.FileSystemObjectType -eq 'File' } |
        ForEach-Object { $bytes += [long]$_.FieldValues['File_x0020_Size'] }

    [pscustomobject]@{
        Library = $lib.Title
        SizeMB  = [math]::Round($bytes / 1MB, 2)
    }
}
Library           SizeMB
-------           ------
Agent Knowledge     0.07
Project Documents   0.07
...

Took : 3.7s for 5 libraries

Note the field name, File_x0020_Size, with the encoded space. That is the internal name, and it will not work as “File Size”. I wrote up why that happens in finding a list’s internal column names.

The gap is unbounded, not four times

On my tiny demo site the fast way took 805ms and the slow way 3.7 seconds, roughly four times slower. That ratio is not the point, because it does not hold.

The fast way is one call regardless of size. The slow way is one call per item. On five near-empty libraries that is nothing. On a library of fifty thousand documents it is fifty thousand round trips, and now you are measuring in minutes per library rather than seconds per site. The gap grows with every file you add.

So the rule is simple. If you have admin and you only need whole-site totals, use StorageUsageCurrent and be done in a second. Only drop to summing files when you genuinely need a per-library breakdown, and when you do, expect it to be slow and scope it to one site at a time.

The version I keep

Get-PnPList |
    Where-Object { -not $_.Hidden -and $_.BaseTemplate -in @(100, 101) } |
    Select-Object Title,
        @{n='Kind';  e={ if ($_.BaseTemplate -eq 101) { 'Library' } else { 'List' } }},
        @{n='Items'; e={ $_.ItemCount }},
        @{n='LastChanged'; e={ $_.LastItemUserModifiedDate }} |
    Sort-Object Kind, Title |
    Format-Table -AutoSize

Fast, honest about what it is showing, and no admin needed. It counts folders in the item total, so if that matters for what you are doing, add the FileSystemObjectType filter, and know that you are trading speed for accuracy 🙂

Enough PowerShell to Be Useful: Six Commands and One Idea

You do not need to learn PowerShell to run PowerShell. Most SharePoint admin scripting is six commands and one idea, and once you have those the rest is looking things up as you go.

This is those six, shown on the kind of data you actually handle: list items with a title, a status, a budget and an owner. Everything below was run on PowerShell 7.

The one idea: the pipeline moves objects, not text

This is the thing that makes PowerShell different from every shell before it, and it is the thing that makes the six commands work.

When you pipe something with |, you are not passing text along. You are passing objects, and each object has properties you can name:

$items | Get-Member -MemberType NoteProperty
Budget
Owner
Status
Title

Get-Member is how you find out what an object has. When a script somewhere returns something and you do not know what you can do with it, pipe it into Get-Member. It is the most useful command for learning that PowerShell has.

1. Where-Object: keep the rows you want

$items | Where-Object { $_.Status -eq 'Complete' }
Project 01
Project 04

$_ is “the current object”. Inside the braces it means the one item Where-Object is looking at right now.

Since PowerShell 3 there is a shorter form for simple checks:

$items | Where-Object Status -eq 'Complete'

Same result, no braces, no $_. Use the short form for one condition and the brace form when you need more than one.

The operators are words, not symbols

This trips up everyone coming from another language:

-eq  -ne  -gt  -lt  -ge  -le      not  ==  !=  >  <

The reason is that > already means "redirect output to a file" in a shell. So PowerShell spells its comparisons out. Type $a > $b expecting a comparison and you will silently create a file called $b.

Two more you will use constantly:

$items | Where-Object { $_.Title -like 'Project*' }    # wildcard
$items | Where-Object { $_.Title -match 'Q[0-9]' }     # regex

-like takes wildcards (* and ?). -match takes a regular expression. Reach for -like first; it is simpler and it is usually enough.

And one that causes real bugs, -eq is case-insensitive by default:

'Complete' -eq 'complete'    # True
'Complete' -ceq 'complete'   # False - the c prefix makes it case-sensitive

Usually the case-insensitive default is what you want. Just know it is the default, so a comparison you expected to fail on case will quietly pass.

2. Select-Object: choose columns, or take the first few

$items | Select-Object Title, Budget -First 3
Title      Budget
-----      ------
Project 01   1000
Project 02   2000
Project 03   3000

Two jobs in one command: pick which properties you want, and -First / -Last to take a slice.

The one worth knowing separately is -ExpandProperty. Plain Select gives you objects with one property. ExpandProperty gives you the raw values:

$items | Select-Object -ExpandProperty Owner -Unique
alice@contoso.com, bob@contoso.com, carol@contoso.com

When you want a plain list of email addresses to loop over rather than a table to look at, that is the one.

3. Sort-Object

$items | Sort-Object Budget -Descending | Select-Object -First 2 Title, Budget
Title      Budget
-----      ------
Project 05   5000
Project 04   4000

Sort, then take the first two, and you have "the two biggest", which is most of what "top N" reporting ever is.

4. Measure-Object: the sums you would otherwise export to Excel for

$items | Measure-Object Budget -Sum -Average -Maximum
Count   : 5
Sum     : 15000
Average : 3000
Maximum : 5000

Count on its own is the everyday one. "How many items match" is just (... | Measure-Object).Count, or on most objects simply .Count.

5. Group-Object: counts per category, in one line

$items | Group-Object Status | Select-Object Count, Name
Count Name
----- ----
    1 Blocked
    2 Complete
    2 In Progress

This is a pivot table in one command. "How many sites per template", "how many items per status", "how many files per owner", all Group-Object. It is the report people are most surprised PowerShell writes for free.

6. ForEach-Object: do a thing to each one

$items | ForEach-Object { "$($_.Title) = $($_.Budget)" }

Same $_ as Where-Object, but instead of keeping or dropping the item you do something with it. This is where the actual work happens, updating each item or building each line of a report.

ForEach-Object is not foreach

There are two, they look similar, and the difference matters:

$items | ForEach-Object { ... }     # a cmdlet, works IN a pipeline, uses $_

foreach ($item in $items) { ... }   # a statement, its own variable, NOT pipeable

ForEach-Object sits in a pipeline. foreach is a language keyword and cannot be piped into. Put a pipe after its closing brace and you get "An empty pipe element is not allowed", which does not obviously point at the mistake.

Use ForEach-Object in a pipeline, foreach when you are already writing a block of script. For large collections foreach is faster, but you will not notice until you are into tens of thousands of items.

One trap that is worth ten minutes now

When a filter returns exactly one item, older PowerShell gave you that single object, not a collection of one, so .Count was $null instead of 1:

$one = $items | Where-Object { $_.Status -eq 'Blocked' }
$one.Count        # 1 in PowerShell 7, was $null in 5.1

PowerShell 7 fixed this, but plenty of tenants still run 5.1, and a script that checks if ($result.Count -gt 0) will silently do the wrong thing there. Wrap anything you are going to count:

$one = @($items | Where-Object { $_.Status -eq 'Blocked' })
$one.Count        # 1 - reliable on every version

The @() forces an array even around a single result. It is the cheapest habit in PowerShell and it saves a specific, maddening bug.

That is the toolkit

Filter with Where-Object, pick with Select-Object, order with Sort-Object, total with Measure-Object, pivot with Group-Object, act with ForEach-Object. Six commands, one pipeline, and Get-Member to tell you what you are holding when you get lost.

Nearly everything in my SharePoint PowerShell posts is those six pointed at real data. Learn them on made-up objects like these, where nothing can break, and the SharePoint version is just the same commands with a live list on the front 🙂

PowerShell try/catch Is Not Catching Your Error

You wrapped something in try/catch, it failed, and the catch block never ran. The error printed in red. The script carried on as if nothing had happened, and whatever you put in the catch was ignored.

Nothing is broken. PowerShell has two kinds of error, and try/catch only ever reacts to one of them.

Everything below was run on PowerShell 7.5.8.

The demonstration

try {
    Get-Item 'C:\does\not\exist\nothing.txt'
    "...execution continued past the failing line"
} catch {
    "CAUGHT: $($_.Exception.Message)"
}
Get-Item:
Line |
   6 |      Get-Item $missing
     |      ~~~~~~~~~~~~~~~~~
     | Cannot find path 'C:\does\not\exist\nothing.txt' because it does not exist.
...execution continued past the failing line

The error was written out. The catch block never ran, and the line after it did.

Now the same thing with four extra words:

try {
    Get-Item 'C:\does\not\exist\nothing.txt' -ErrorAction Stop
} catch {
    "CAUGHT: $($_.Exception.Message)"
}
CAUGHT: Cannot find path 'C:\does\not\exist\nothing.txt' because it does not exist.

Why

Most cmdlet errors are non-terminating. The cmdlet reports a problem and PowerShell carries on, because when you pipe a thousand items into something you usually want the other 999 to be processed.

try/catch only reacts to terminating errors.

-ErrorAction Stop promotes a non-terminating error to a terminating one for that call. That is the whole trick, and it is why so much published PowerShell has try/catch blocks in it that do nothing at all.

Write-Error is not throw

Worth knowing if you are writing your own functions:

try { Write-Error 'this is a Write-Error' } catch { "caught" }
try { throw 'this is a throw' }             catch { "caught: $($_.Exception.Message)" }
Write-Error: this is a Write-Error
caught: this is a throw

Write-Error raises a non-terminating error and is not caught. throw is terminating and is.

So if you write a function that reports failure with Write-Error, nobody calling it can catch that failure unless they also pass -ErrorAction Stop. Use throw when you mean stop.

Turning it on for a whole script

Rather than putting -ErrorAction Stop on every line:

$ErrorActionPreference = 'Stop'
CAUGHT without -ErrorAction on the cmdlet

Put that at the top of a script and every cmdlet error becomes terminating. For an admin script that changes things, this is almost always what you want. Stopping on the first problem beats carrying on and doing half the job.

It is scoped. Set it inside a function and it applies there, not to the caller. That is useful, and it also means setting it in your profile does not protect your scripts.

Catching one kind of error and not others

A bare catch catches everything, including the failures you had not thought about. You can be specific:

try {
    Get-Item $path -ErrorAction Stop
} catch [System.Management.Automation.ItemNotFoundException] {
    "matched the typed catch: file not found"
} catch {
    "fell through to the generic catch"
}
matched the typed catch: file not found

To find the type name for something you are actually hitting, let it fail once and ask:

$Error[0].Exception.GetType().FullName
$Error[0].FullyQualifiedErrorId
$Error[0].CategoryInfo.Category
System.Management.Automation.ItemNotFoundException
PathNotFound,Microsoft.PowerShell.Commands.GetItemCommand
ObjectNotFound

FullyQualifiedErrorId is the precise one. It names both the problem and the cmdlet that raised it, which is what you want when two different cmdlets can produce the same exception type.

Collecting errors without stopping

Sometimes you want the loop to finish and a list of what went wrong:

Get-Item $path -ErrorAction SilentlyContinue -ErrorVariable itemErr

$itemErr.Count
$itemErr[0].Exception.Message
1
Cannot find path 'C:\does\not\exist\nothing.txt' because it does not exist.

Use +itemErr with a plus sign to append across a loop rather than overwrite each time.

The one that catches everybody: native commands

try/catch does not work on robocopy, git, msiexec or anything else that is not a cmdlet.

try {
    cmd.exe /c "exit 7"
    "no exception was raised"
} catch {
    "caught"
}
no exception was raised

External programs do not raise PowerShell exceptions. They set an exit code, and you have to check it yourself:

cmd.exe /c "exit 7"
$?              # False
$LASTEXITCODE   # 7

Both measured immediately after the call, and that timing matters, because $? reflects the last thing that happened. Put a Write-Host between the command and the check and you are reading the result of the Write-Host. I made exactly that mistake while testing this post.

So for anything external:

robocopy $source $dest /E
if ($LASTEXITCODE -ge 8) { throw "robocopy failed with $LASTEXITCODE" }

Note the -ge 8. Robocopy uses 0-7 for various kinds of success, so testing -ne 0 would fail every time it copied something. Check what your tool’s exit codes actually mean rather than assuming zero is the only good one.

PowerShell 7 can do this for you

There is a setting for it, and it is off by default:

$PSNativeCommandUseErrorActionPreference   # False

Turn it on, with $ErrorActionPreference set to Stop:

$PSNativeCommandUseErrorActionPreference = $true
$ErrorActionPreference = 'Stop'

try { cmd.exe /c "exit 7" } catch { "caught = true" }
caught = true

A non-zero exit code now raises a terminating error you can catch like anything else. Worth knowing, and worth being careful with, because anything that uses non-zero exit codes for non-failures, robocopy included, will start throwing at you.

finally

try {
    Get-Item $path -ErrorAction Stop
} catch {
    "catch ran"
} finally {
    "finally ran"
}
catch ran
finally ran

Runs whether or not anything failed. Use it for the cleanup that has to happen either way, like disconnecting a session or removing a temporary file.

What I actually put in a script

$ErrorActionPreference = 'Stop'

try {
    # everything that changes something
}
catch {
    Write-Error "Failed at $($_.InvocationInfo.ScriptLineNumber): $($_.Exception.Message)"
    throw
}
finally {
    Disconnect-PnPOnline -ErrorAction SilentlyContinue
}

$_.InvocationInfo.ScriptLineNumber tells you where it broke, which the message on its own does not. And the bare throw at the end re-raises the original error rather than swallowing it, so whatever called your script still finds out it failed.

Catching an error and then carrying on quietly is worse than not catching it. At least the red text was honest 🙂

PowerShell: Running Scripts Is Disabled on This System

You try to run a script and PowerShell refuses:

File C:\Scripts\demo.ps1 cannot be loaded because running scripts is disabled
on this system. For more information, see about_Execution_Policies at
https:/go.microsoft.com/fwlink/?LinkID=135170.
    + CategoryInfo          : SecurityError: (:) [], ParentContainsErrorRecordException
    + FullyQualifiedErrorId : UnauthorizedAccess

Or this one, which is a different problem with the same cause:

File C:\Scripts\demo.ps1 cannot be loaded. The file C:\Scripts\demo.ps1 is not
digitally signed. You cannot run this script on the current system.

Every answer you will find says to run Set-ExecutionPolicy. That is usually right and often does not work, because there are three separate things that produce these messages and only one of them is fixed that way.

First, what execution policy is not

It is not a security boundary. Microsoft say so themselves in the documentation. Anyone who can run PowerShell can bypass it in about four keystrokes, and I will show you how further down.

It exists to stop you double-clicking something by accident. Treat it as a seatbelt, not a lock.

The five scopes, and which one is winning

This is the part that catches people. There is not one execution policy, there are five, and they override each other in a fixed order:

MachinePolicy  ->  UserPolicy  ->  Process  ->  CurrentUser  ->  LocalMachine

Highest wins. So Get-ExecutionPolicy on its own tells you the effective answer but not which scope produced it. Always ask for the list:

Get-ExecutionPolicy -List

Here is my own machine:

        Scope ExecutionPolicy
        ----- ---------------
MachinePolicy       Undefined
   UserPolicy       Undefined
      Process          Bypass
  CurrentUser       Undefined
 LocalMachine    RemoteSigned

The effective policy is Bypass, not RemoteSigned. Something set it at Process scope for this session, and Process beats LocalMachine.

MachinePolicy and UserPolicy come from Group Policy. If either of those is set, nothing you type will change anything, and you will spend an afternoon finding that out. Check those two first.

Fix 1 – set it for yourself only

Set-ExecutionPolicy -ExecutionPolicy RemoteSigned -Scope CurrentUser

-Scope CurrentUser does not need administrator rights, and it does not change the machine for anybody else. On a shared or managed machine that matters.

RemoteSigned is the sensible setting: scripts you wrote locally run, scripts that came from somewhere else need a signature. It is the default on Windows Server for that reason.

Fix 2 – bypass it for one command

If you cannot change the policy, or do not want to:

powershell.exe -NoProfile -ExecutionPolicy Bypass -File C:\Scripts\demo.ps1

This changes nothing permanently. It applies to that one process and then it is gone.

I ran the same blocked script three ways to show the difference:

-ExecutionPolicy Restricted    "running scripts is disabled on this system"
-ExecutionPolicy AllSigned     "is not digitally signed"
-ExecutionPolicy Bypass        the script ran

Which is also the demonstration that execution policy is not security. Four extra words on the command line and the “blocked” script runs.

Fix 3 – the one nobody mentions

Here is the case that makes people think the policy is broken.

Your policy is RemoteSigned. You wrote a script locally, it runs fine. A colleague emails you one, or you download it, and it refuses, with the “not digitally signed” message this time rather than “disabled on this system”.

The policy is correct. The file is marked.

Windows adds a hidden alternate data stream to anything that arrives from the internet or an email client. You can see it:

Get-Item .\demo.ps1 -Stream *
Stream          Length
------          ------
:$DATA              30
Zone.Identifier     26

That Zone.Identifier stream is the mark of the web, and RemoteSigned is doing exactly what it says by treating the file as remote.

Remove it:

Unblock-File -Path .\demo.ps1

Same script, same policy, straight afterwards:

the script ran

Note that Unblock-File only removes the mark. It does not weaken your policy and it does not affect any other file. It is the right fix for this case, and changing the execution policy to work around it is the wrong one.

For a folder of scripts:

Get-ChildItem .\Scripts\*.ps1 -Recurse | Unblock-File

Fix 4 – you fixed the wrong PowerShell

This one cost me time, so it is worth knowing.

Windows PowerShell 5.1 and PowerShell 7 keep their execution policies in completely separate places. Setting it in one does nothing for the other.

They are different registry keys:

Windows PowerShell 5.1  HKLM\SOFTWARE\Microsoft\PowerShell\1\ShellIds\Microsoft.PowerShell
PowerShell 7 (Core)     HKLM\SOFTWARE\Microsoft\PowerShellCore\ShellIds\Microsoft.PowerShell

On my machine 5.1 has RemoteSigned set at both LocalMachine and CurrentUser, and the PowerShell 7 keys do not exist at all.

So if you opened the blue window, ran Set-ExecutionPolicy, then went back to the black window and got the same error, that is the reason. Run $PSVersionTable.PSVersion in whichever one is refusing, and fix that one.

The order I would check them in

  1. Get-ExecutionPolicy -List – find which scope is actually winning
  2. If MachinePolicy or UserPolicy is set, stop. That is Group Policy and it is not your decision
  3. Get-Item .\script.ps1 -Stream * – if there is a Zone.Identifier, Unblock-File is your fix
  4. Check which PowerShell you are in
  5. Then, and only then, Set-ExecutionPolicy RemoteSigned -Scope CurrentUser

Four of those five cost you nothing and change nothing. Reaching for Set-ExecutionPolicy first is how people end up with an unrestricted machine and a script that still does not run 🙂